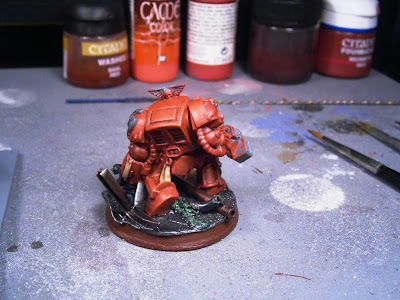
On the desk I have the Terminators from the Space Hulk Boardgame and a couple of my own; it was time to get some paint on them! I started off with my standard grey primer which I ensured a smooth coverage overall; next came the Mechrite Red Base Coat. Yes I still use some of the old GW paints; when the company changes paint formulas halfway through a project you have to make do with what you started the project with. Here are some various shots of the Mechrite Red coating:
There is one Terminator that had to have his base built around him so I have to be careful when painting him that I do not ruin the paint on the base. I do like how he acts as a 'test' miniature to see how the paint job will look when the Terminators are put on their custom bases which are waiting for them. Here he is in Mechrite Red:
After two thin coats of Mechrite Red (to ensure even coverage) I used a custom 'Deep Crimson' wash to add some depth to the base coat. Here is the group (including the lone guy on his base) after the 'Deep Crimson' wash:
After waiting an hour to ensure the wash had completely dried I hit the miniatures with the next stage of red which is 'Gory Red'. Here are some shots of the next step:
The next step for me was to hit the upper areas (where the light shines the most) with 'Scar Red'. This is the final highlight for me; here are some shots of the 'Scar Red' step:
The final step for me in painting my Blood Angel Red is a Custom Baal Red/Red Ink Wash that helps 'knock down' any harsh highlights and helps to blend the various different reds together. Here is the bunch with the red all done:
I think the red works for Blood Angels and it is easy to paint (which is important when painting a hundred plus miniatures). At this point the Terminators looked like little lumps of red in dire need of some details to be picked out with other colors. At this point I enlarged the back cover of the Space Hulk Boardgame Rulebook (which has a very nice picture of the Terminators painted up) and hung it on the wall in front of my painting desk. I did this so I could double check on how GW painted theirs while I was painting mine. Here is a shot of it hanging:
With the picture as an aid I started in on the finer details of the paint process. I was getting pressed for time (as errands and housework called) so I decided to stay away from colors that were needed in large amounts on all of the miniatures. I will get to those next! Here are the Terminators as they sit right now on the painting desk:
I do like this shot!
At this point it was time to call it quits in the hobby room but not before I cleaned my brushes! Painting red tends to be a little hard on the paint brushes as they tend to get 'stained' by the various reds and it is important to always clean your brushes especially after painting red!
That is all for now folks, thanks for stopping by my little corner of the InterWebs! Take care!


That is very much a lot of red!
ReplyDeleteThey look good... a hundred plus?!? I can't even fathom. (short attention span apparently)
Glad you had a nice Thanksgiving (okay; the 4-day weekend part) and got to paint. The wash really made a difference, and I was wondering how all of the reds would be "blended" in to each other.
As always, thanks for sharing
It is a lot of red! the 100+ minis is over the whole army. Adding the details on the minis seems to make the red stand out a bit more. Thanks for looking!
Delete