Showing posts with label Press Mold. Show all posts

Sunday, September 15, 2013

Salamander Holsters Greenstuff WiP

Greetings once again InterWebs!!!! It has been a crazy week here, there have been massive floods with roads being washed away and what not. I actually had to spend a fair amount of time bailing out the basement which had flooded. I needed a break today so I decided to get some hobby work done as a bit of a reward to myself. I am pressing on with my Legio XVIII Salamanders force so with the upheaval in the house I started with a bit of organization, then moved on to washing/cleaning resin goodies for 2 20-man Tactical Squads, and finally decided that I needed a whole bunch of holsters for the Marines (each has a Bolter and Bolt Pistol). I know Forge World makes special resin holsters for the Horus Heresy but I wanted Salamander looking Bolt Pistol Holsters! So I set off to work out some Salamander looking Holsters which I could then duplicate across the whole force. I decided that I wanted holsters that have: fire, drake looking stuff, and scales; here is the first steps on some fire holsters:

After the first layer dried I went in and added a little more in certain areas to help build up the flames a bit (it is hard to tell but it did help the flames raise up a bit):

Here is a group shot of the others I did up as well:


A couple of shots from the sides:
 These were really hard to take pictures of because they are so freaking tiny!

I am not even remotely good at greenstuff work but I think these turned out fairly well and definitely have that Salamander's feel. It was time at that point to break out the Instant Mold (for previous use see here) and make some press molds:


After the greenstuff dried I popped them out of the press mold where I found that some worked well and a couple did not (no big deal):

Here is one of them that I quickly got cleaned up before real life called again:

Here is the workbench with the first of the Salamander 20 man Tactical Squads waiting to be assembled now that I have an unlimited supply of Salamander Holsters:


Yes indeed Vulkan is watching over the assembly of his Legion! Thanks for stopping by and taking a look! Take care!

Tuesday, March 13, 2012

A Couple of Land Raiders for the Sons of Sanguinius

I have had a little bit of free time since I got back from England and while most of that free time has been taken up by an editing project that I have I did manage to sneak away for a bit and work on a few things. First off I was able to primer the Devastator Squad and a couple of Veterans for use in various squads.

Secondly I was able to get some work in on a couple of Land Raiders (Standard and Redeemer) that both needed a fair bit of love to bring them up to snuff. I have always hated the fact that an entire section of track is left exposed on the front of the Lad Raiders, while this was covered up by the Frag Launchers of the Redeemer I knew I wanted to do something with the other. After a dig around in the Cities of Death Bitz Boxes I located a nice door with an Aquila on it. After cutting it down, cutting to length, cutting out the back supports, and blending it into the hull with Greenstuff and Liquid Greenstuff I think it turned out fairly well. Here are some various in process pics along with some views of it with a brief coverage of primer (I ran out of primer but got enough to show that the 'front armor plates' do blend fairly well):


Bringing the Redeemer back to life took quite a bit of work. I am glad I had all new bits to make the rebuild a lot easier. One of the options for a Land Raider to take is a Multi-Melta and I had enough actual bits to make 1 so I knew I had to dig into the Vehicle Bitz Box and scratch build another Multi-Melta 'turret'. Both of these are removable and have a small weight to ensure that they sit and stay in their holes. Here are a couple of pics of the scratch built Multi-Melta turret:


Since I have been doing a fair amount of Blood Angel Vehicles lately I have found myself running out of various vehicle icons; so a return to the InstaMold that I tried a couple of months ago. I have learned quite a bit about using the stuff. Needless to say I have been having fun with press-molding 'bling' for the Blood Angel's Vehicles:


Well that is all for now, thank you for looking!
Take Care,
David

Tuesday, September 20, 2011

Having Fun With A Simple Press Mold

I really wanted to 'bling-up' the Mk 1 Predator I recently put together and I felt that the curved sponsons really called out for a winged blood drop to set them off just right. In the past I have attempted various press mold techniques and was never really happy with the results. After noticing this at my FLGS I decided to give it a try:


About the same time I decided to purchase the Insta Mold I ran across a really good tutorial at Chest of Colors that sealed the deal to give this stuff a try. So after reading the brief instructions on the package and going through the tutorial I came up with this:


Apparently you can combine several of the pieces together to achieve a larger 'Mold' surface, I have yet to try this but I will be shortly (I have just the project in mind). The Master Mold sets up quickly, a mere matter of minutes it seemed. After I was sure the Master Mold was nice and firm I whipped up some greenstuff and pressed it firmly and carefully into the Master Mold:


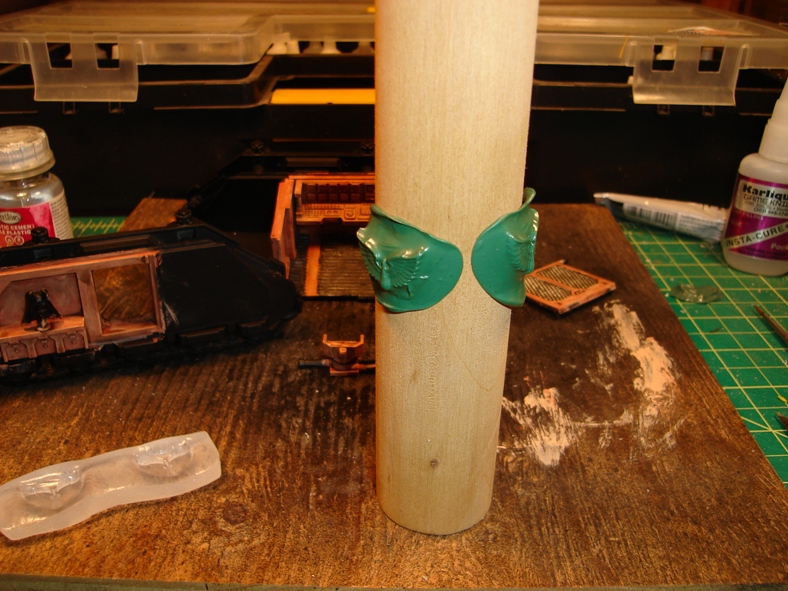
The side sponsons on the Mk 1 Predator are very rounded so I knew that I wanted to curve the greenstuff duplicates. To achieve this I waited a couple of minutes to allow the greenstuff to firm up just a bit and while the greenstuff was still slightly malleable I took a wooden roller and rolled it along the length of the Master Mold. This rolled the the greenstuff duplicates cleanly out of the Master Mold and allowed the greenstuff duplicates to 'pick up' the curvature of the wooden roller. I then put the whole set up aside overnight to dry:


Once the greenstuff duplicates were completely dry I peeled them off the wooden roller and removed the excess greenstuff. I also removed a bit of the extra greenstuff from the back of the piece and then it was a simple matter of gluing them in place. The wooden roller created a near perfect curvature to the back of the greenstuff duplicate. Here are a couple of shots of the winged blood drop installed:


Here is a shot from the top down which shows a bit of the curvature that was achieved:


Some of my thoughts on the Insta Mold product:
1) The stuff is simple to use
2) The stuff is slippery and pressing the greenstuff into the Master Mold can be tricky
3) The slipperiness can be used to your advantage if you are careful

Thanks for looking and comments are always welcome!