Well it was a busy weekend but I did manage to get a little hobby time in. I wanted to tackle a problem that had been vexing me for a while: how do I hinge the side door of a Rhino so it will open? After several attempts that all failed I came on this idea:
First off I drilled out the hinges on a standard Rhino door and slipped a thin wire through. I also applied a small 'v-bend' to the wire which I hoped would act as a bit of extra tension on the door. It looks like this:
After looking at the door action I decided that the front side of the door along the bottom edge between the hinges would require a little bit of a beveled edge to allow the door to swing fully down. Here is a view of the front of the Rhino door with the hinge wire and the beveled edge:
The next step (which is the tricky part) was to cut two angled cuts into the side of the Rhino to allow the hinge wire to sit flush with the side of the Rhino. The cuts are small but there is a fair amount of detail around so I had to be careful. Here is a view of the cuts that need to be made:
You can see that the wire will sit in these little grooves and along the inside edge of the step. This is where I applied the glue that holds the whole assembly together and allows the door to swing on its hinges (like it should). Here is the door glued in place:
A little contour putty to blend over the cuts and wire and you should never know that it is there. The best thing is the wire adds a bit of tension to the door which allows it to stay closed, partially open, or fully opened (or any position in between). Here are some views of the door in action:
I am pleased with the results and once the putty has dried I will snap some more pictures of the finished area. Thanks for looking!
Sunday, October 9, 2011
Sunday, October 2, 2011
Blood Angel Rhino with blood drop top
Well it was a busy weekend but I did manage to get some hobby time in. I needed to repair one of my Baal Predators which I managed to do with the help of some small magnets. That left me some time to work on a basic Rhino for my Tactical Squad. The Rhino assembly went smoothly and when it was done I felt it needed a little something more especially on the top. I added some Forgeworld Blood Angel doors but still felt it needed something more. After all, I see the Blood Angels as Gaudy Gothic.
I know that I have a Death Company Rhino coming up and for that I want to include a plasticard "x" on the top so I thought I would practice the technique a bit on the current Rhino build. While an "x" would not work I thought I would try and make a 'blood drop' that covers the top hatch a bit. For a freehand attempt at a large blood drop I think it turned out rather well. I even managed to line up the hatch lines so it looks like the top hatch still opens.
Here are a couple of pictures of the completed build:
Here is a close up view of the top hatch:
While I was at it I thought I should go ahead and include a Razorback option for it just in case:
That should be all of the 'rhino-based' vehicles that I need to assemble for my adventure in England. Next up on the build desk will be a Furioso Dred and then swarms of assault marines. Thanks for looking and comments are always welcome!
I know that I have a Death Company Rhino coming up and for that I want to include a plasticard "x" on the top so I thought I would practice the technique a bit on the current Rhino build. While an "x" would not work I thought I would try and make a 'blood drop' that covers the top hatch a bit. For a freehand attempt at a large blood drop I think it turned out rather well. I even managed to line up the hatch lines so it looks like the top hatch still opens.
Here are a couple of pictures of the completed build:
Here is a close up view of the top hatch:
While I was at it I thought I should go ahead and include a Razorback option for it just in case:
That should be all of the 'rhino-based' vehicles that I need to assemble for my adventure in England. Next up on the build desk will be a Furioso Dred and then swarms of assault marines. Thanks for looking and comments are always welcome!
Sunday, September 25, 2011
Damocles Command Rhino-Initial Build/Interior Paint
Well I managed to get some more Hobby time in this weekend and I decided to work on something I have had sitting around for years: a Blood Angels Damocles Command Rhino. This is a nice little kit available from Forgeworld which I have always wanted to build and paint. The detailed interior is just awesome and I knew I wanted to make it as visible as possible. This was a build that needed to be done in steps:
Step 1: Painting the Interior. After making sure the resin pieces were all nice and clean I went ahead and assembled the interior pieces of the Damocles kit. A quick primer and a brief wait; I was ready to lay paint to a brush. Here are a couple of shots of the interior all painted up.
I had to remember that most of this will be in 'shadows' as it will be all contained by the outside sections of the hull. I wanted to paint it nice and vivid so it would show up at all. While the sealant was drying I knocked out the 2 command marines. Here are a couple of shots of the marines before they 'take their seats' at the console.
Once all the various pieces of the interior were painted and sealed I went ahead and assembled the completed interior. It gets a little cramped in the Damocles!
With the interior completed I set about to finish up the rest of the build. I have one little complaint with the Damocles kit, the Top Hatch Assembly didn't really line up well with the top area of the Rhino. I plan on leaving it loose so it can be removed to see into the interior easier so it was not a huge deal. I had some Blood Angel doors that I thought would be a nice touch. The rest of the exterior build is fairly straight forward. Here are a few shots of the completed build of the Damocles:
Well there is my Blood Angels 4th Company Damocles Command Rhino ready for primer and paint. My plan is to assemble the various vehicles I will need for the game in March and primer and paint them all together. This will help me maintain a consistent paint job across the vehicles I hope.
Take care, thanks for looking, and comments are always welcome!
Step 1: Painting the Interior. After making sure the resin pieces were all nice and clean I went ahead and assembled the interior pieces of the Damocles kit. A quick primer and a brief wait; I was ready to lay paint to a brush. Here are a couple of shots of the interior all painted up.
I had to remember that most of this will be in 'shadows' as it will be all contained by the outside sections of the hull. I wanted to paint it nice and vivid so it would show up at all. While the sealant was drying I knocked out the 2 command marines. Here are a couple of shots of the marines before they 'take their seats' at the console.
Once all the various pieces of the interior were painted and sealed I went ahead and assembled the completed interior. It gets a little cramped in the Damocles!
With the interior completed I set about to finish up the rest of the build. I have one little complaint with the Damocles kit, the Top Hatch Assembly didn't really line up well with the top area of the Rhino. I plan on leaving it loose so it can be removed to see into the interior easier so it was not a huge deal. I had some Blood Angel doors that I thought would be a nice touch. The rest of the exterior build is fairly straight forward. Here are a few shots of the completed build of the Damocles:
Well there is my Blood Angels 4th Company Damocles Command Rhino ready for primer and paint. My plan is to assemble the various vehicles I will need for the game in March and primer and paint them all together. This will help me maintain a consistent paint job across the vehicles I hope.
Take care, thanks for looking, and comments are always welcome!
Tuesday, September 20, 2011
Having Fun With A Simple Press Mold
I really wanted to 'bling-up' the Mk 1 Predator I recently put together and I felt that the curved sponsons really called out for a winged blood drop to set them off just right. In the past I have attempted various press mold techniques and was never really happy with the results. After noticing this at my FLGS I decided to give it a try:
About the same time I decided to purchase the Insta Mold I ran across a really good tutorial at Chest of Colors that sealed the deal to give this stuff a try. So after reading the brief instructions on the package and going through the tutorial I came up with this:
Apparently you can combine several of the pieces together to achieve a larger 'Mold' surface, I have yet to try this but I will be shortly (I have just the project in mind). The Master Mold sets up quickly, a mere matter of minutes it seemed. After I was sure the Master Mold was nice and firm I whipped up some greenstuff and pressed it firmly and carefully into the Master Mold:
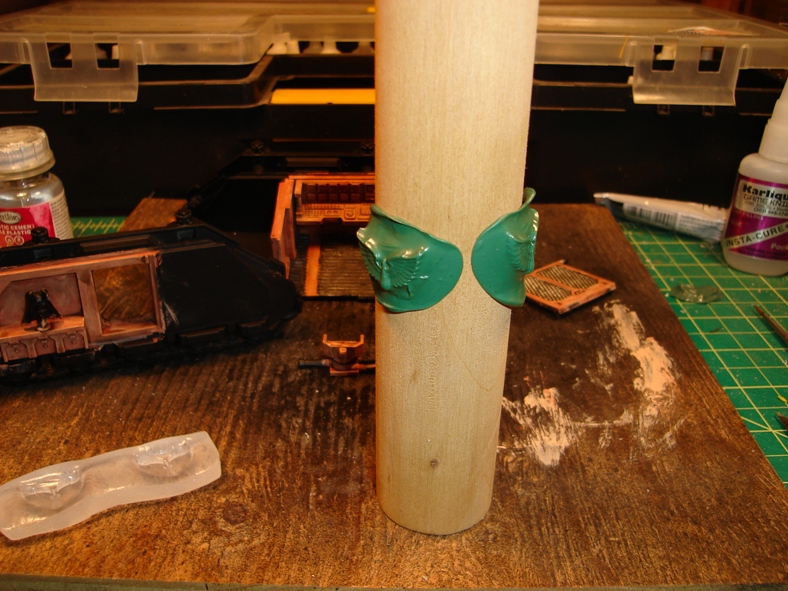
The side sponsons on the Mk 1 Predator are very rounded so I knew that I wanted to curve the greenstuff duplicates. To achieve this I waited a couple of minutes to allow the greenstuff to firm up just a bit and while the greenstuff was still slightly malleable I took a wooden roller and rolled it along the length of the Master Mold. This rolled the the greenstuff duplicates cleanly out of the Master Mold and allowed the greenstuff duplicates to 'pick up' the curvature of the wooden roller. I then put the whole set up aside overnight to dry:
Once the greenstuff duplicates were completely dry I peeled them off the wooden roller and removed the excess greenstuff. I also removed a bit of the extra greenstuff from the back of the piece and then it was a simple matter of gluing them in place. The wooden roller created a near perfect curvature to the back of the greenstuff duplicate. Here are a couple of shots of the winged blood drop installed:
Here is a shot from the top down which shows a bit of the curvature that was achieved:
Some of my thoughts on the Insta Mold product:
1) The stuff is simple to use
2) The stuff is slippery and pressing the greenstuff into the Master Mold can be tricky
3) The slipperiness can be used to your advantage if you are careful
Thanks for looking and comments are always welcome!
About the same time I decided to purchase the Insta Mold I ran across a really good tutorial at Chest of Colors that sealed the deal to give this stuff a try. So after reading the brief instructions on the package and going through the tutorial I came up with this:
Apparently you can combine several of the pieces together to achieve a larger 'Mold' surface, I have yet to try this but I will be shortly (I have just the project in mind). The Master Mold sets up quickly, a mere matter of minutes it seemed. After I was sure the Master Mold was nice and firm I whipped up some greenstuff and pressed it firmly and carefully into the Master Mold:
The side sponsons on the Mk 1 Predator are very rounded so I knew that I wanted to curve the greenstuff duplicates. To achieve this I waited a couple of minutes to allow the greenstuff to firm up just a bit and while the greenstuff was still slightly malleable I took a wooden roller and rolled it along the length of the Master Mold. This rolled the the greenstuff duplicates cleanly out of the Master Mold and allowed the greenstuff duplicates to 'pick up' the curvature of the wooden roller. I then put the whole set up aside overnight to dry:
Once the greenstuff duplicates were completely dry I peeled them off the wooden roller and removed the excess greenstuff. I also removed a bit of the extra greenstuff from the back of the piece and then it was a simple matter of gluing them in place. The wooden roller created a near perfect curvature to the back of the greenstuff duplicate. Here are a couple of shots of the winged blood drop installed:
Here is a shot from the top down which shows a bit of the curvature that was achieved:
Some of my thoughts on the Insta Mold product:
1) The stuff is simple to use
2) The stuff is slippery and pressing the greenstuff into the Master Mold can be tricky
3) The slipperiness can be used to your advantage if you are careful
Thanks for looking and comments are always welcome!
Sunday, September 11, 2011
Sabre Tankhunter and AotE Painting Chart
So another weekend of getting some work in on the Heresy-era Blood Angels in preparation for the upcoming trip to England. I managed to assemble (for the most part) my Sabre Tankhunter which I plan to use to bring the wrath of Baal to the enemies of the Emperor. I managed to get a hold of a very nice kit from Bare Bones Models. The kit is designed to work with the Space Marine Vindicator model. While some of the resin pieces needed some work I was very impressed with the fact that the kit came with instructions!
The first step was basically the same for all Space Marine vehicles, build your kit to this stage:
I love the Rhino chassis! I swear I could put this together in my sleep at this point! Well the next step according to the instructions (did I mention the kit came with instructions!) was to seperate the 'extra armor' door sections that the Vindicator kit comes with. It was very easy to do this, the door sections have a little grove that the saw blade fit right into. Using this grove allowed me to keep the cut parallel and neat. The 'extra armor' door sections look like this before I cut them apart:
After the door section is removed it will look like this:
Now here is where I messed up a bit and the instructions were not super clear. You are supposed to use one of the basic rhino doors on the side that the power coils mount to but not use a rhino door on the opposite side. I went ahead and put the basic rhino doors on both sides. The sidedoor detail that comes with the kit is designed to go into the door opening. I had to mount it to the outside of the rhino door but I don't think you can really tell that it is slightly raised. Take a look here:
The rest of the kit went together like a dream. The instructions were very helpful with the rest of the build process. I decided that I would like to use it as a Vindicator as well as a Sabre so I magnetized the barrel options. I didn't want to magnetize the power generators on the side of the Sabre so when I use it as a Vindicator it will have some extra fancy bits. I even went with having the Siege Shield be removable; figured it would be easier to paint and if I wanted to save some points it is an option to remove it as this point.
Here are some other shots of the Sabre tankhunter:
Now all that is left to do with the build is attach some guitar string between the two generator units. I did not have a suitable size of wire this weekend so it will have to wait a few days. I attempted to make some winged blood drops to 'bling up' the Sabre and the Mk 1 Predator but the press mold did not work very well and I have to start over with those. I do have one of the new Storm Raven and Baal Predator kits and I believe both of them come with various Blood Angel icons that I might be able to use.
If this post was not long enough, I managed to work out a starting painting chart to help me keep track of my purchase, build, and painting progress in my attempt to get ready for England. Here is what it looks like so far (this is still early planning stages and may change slightly over time):
Well that is it for now, thanks for looking!
The first step was basically the same for all Space Marine vehicles, build your kit to this stage:
I love the Rhino chassis! I swear I could put this together in my sleep at this point! Well the next step according to the instructions (did I mention the kit came with instructions!) was to seperate the 'extra armor' door sections that the Vindicator kit comes with. It was very easy to do this, the door sections have a little grove that the saw blade fit right into. Using this grove allowed me to keep the cut parallel and neat. The 'extra armor' door sections look like this before I cut them apart:
After the door section is removed it will look like this:
Now here is where I messed up a bit and the instructions were not super clear. You are supposed to use one of the basic rhino doors on the side that the power coils mount to but not use a rhino door on the opposite side. I went ahead and put the basic rhino doors on both sides. The sidedoor detail that comes with the kit is designed to go into the door opening. I had to mount it to the outside of the rhino door but I don't think you can really tell that it is slightly raised. Take a look here:
The rest of the kit went together like a dream. The instructions were very helpful with the rest of the build process. I decided that I would like to use it as a Vindicator as well as a Sabre so I magnetized the barrel options. I didn't want to magnetize the power generators on the side of the Sabre so when I use it as a Vindicator it will have some extra fancy bits. I even went with having the Siege Shield be removable; figured it would be easier to paint and if I wanted to save some points it is an option to remove it as this point.
Here are some other shots of the Sabre tankhunter:
Now all that is left to do with the build is attach some guitar string between the two generator units. I did not have a suitable size of wire this weekend so it will have to wait a few days. I attempted to make some winged blood drops to 'bling up' the Sabre and the Mk 1 Predator but the press mold did not work very well and I have to start over with those. I do have one of the new Storm Raven and Baal Predator kits and I believe both of them come with various Blood Angel icons that I might be able to use.
If this post was not long enough, I managed to work out a starting painting chart to help me keep track of my purchase, build, and painting progress in my attempt to get ready for England. Here is what it looks like so far (this is still early planning stages and may change slightly over time):
Well that is it for now, thanks for looking!
Monday, September 5, 2011
Mk 1 Predator/AAV for the Emperor's Great Crusade
Well I got some hobby time in over the long weekend and I was able to get some work in on my Mk 1 Predator/AAV for use in any Heresy-era games I might play. My good buddy mordian7th and I are planning on taking a trip to jolly olde England in March to play some 40k in the Tempus Fugitives campaign weekend. With that in mind I am having to buckle down and work on my beloved Blood Angels. The plan is to make some Heresy-era miniatures but still use the majority of my current-era troops.
The first model up on the modeling bench is my attempt to make a Mk 1 Predator that I could use as a base-line predator, or a Crusade-era Predator AAV, or a MK 1 Baal Predator. I was able to get my hands on a rather nice after-market resin conversion kit produced by Blood and Skulls Industry and the kit was a pleasure to work with!
To start with I built my current rhino model up to this stage:
Please excuse the state of the Rhino kit, it is an Ebay deal that I stripped in simple green and was perfect for this project. So the next stage of the process was to remove both of the exhausts from both sides. I did this with a flat Xacto saw blade which I laid flat against the side of the Rhino and slowly and carefully removed the raised exhaust areas. I found that coming at the raised area from both sides worked best for me; I started removing it from one side and when half-way through I switched to the other side and my cuts met in the middle.
Here is a close-up shot of the model with the exhausts removed:
While cutting the exhausts off I had to remove the little 'step' at the bottom of the door. At this point I was ready to attach the side panels and the front hatch. The model starts to look like a Mk 1 at this point.
The next step was to attach the very distinctive Mk 1 exhausts (which you can sort of see on the other side of the model).
You will note that the conversion kit comes with pre-drilled holes to mount 1/8" x 1/16" magnets and this is what led me to try and magnetize as much as I could. I knew I wanted to be able to take the side sponsons off to turn it into a Heresy-era Predator AAV. The side hatches used for the Mk 1 Rhinos and Predator AAVs are very thin (about 1/16") and would not really hold a magnet. I thought of backing them with a thin sheet of metal but I had nothing at hand that would work. I settled on using paperclips. It was easy to drill three small holes in the back of the hatches making sure not to punch through to the other side. I then cut some small pieces of paperclip and super glued them into the holes. I waited several hours before I filed them paper clip ends flush with the back of the hatches. Bamn, instant metal plugs that the magnets in the hull will grab onto easily.
Here is a look at what I came up with (this is before I filed them flush):
So while those dried I worked on the Predator side sponsons. I wanted to be able to switch them up from Heavy Bolters or Lascannons or Heavy Flamers. I had access to some Hvy Bolters and Lascannons so they were the first to get the magnetic treatment. I also wanted to be able to switch out the main turret weapon and once again the conversion kit was a dream to work with. The turret is designed to slot in a standard GW weapon (I used the Autocannon) and also comes with a turret weapon mount that has holes for magnets which I plan on using to mount the twin-linked assault cannons for a Baal Predator option.
Some shots of the Mk 1 Predator chassis and side sponson loadouts:
I have a little thing that I like to do with my Blood Angel vehicles and that is to have some 'crazy' commanders. I wanted this guy to be holding the Stormbolter option and have the Hunter-Killer Missile be pintle-mounted. I think he turned out decent and he certainly maintains the 'crazy' tank commander look.
Here is a little closer look at him:
So the initial build is complete. All that needs to be done now is 'bling' it up a bit with some Blood Angel Icons. I plan on doing some winged blood drops on the turret which I have a press-mold set up for. Maybe a nice Icon on the front or rear hatch. Might add the winged blood drops to the side sponsons as well. I have to make sure of the actual loadout available to a Predator AAV (things like smoke launchers, search lights, etc.) before I add those but all in all not to bad I think.
Comments are always welcome and thanks for looking.
The first model up on the modeling bench is my attempt to make a Mk 1 Predator that I could use as a base-line predator, or a Crusade-era Predator AAV, or a MK 1 Baal Predator. I was able to get my hands on a rather nice after-market resin conversion kit produced by Blood and Skulls Industry and the kit was a pleasure to work with!
To start with I built my current rhino model up to this stage:
Here is a close-up shot of the model with the exhausts removed:
While cutting the exhausts off I had to remove the little 'step' at the bottom of the door. At this point I was ready to attach the side panels and the front hatch. The model starts to look like a Mk 1 at this point.
The next step was to attach the very distinctive Mk 1 exhausts (which you can sort of see on the other side of the model).
You will note that the conversion kit comes with pre-drilled holes to mount 1/8" x 1/16" magnets and this is what led me to try and magnetize as much as I could. I knew I wanted to be able to take the side sponsons off to turn it into a Heresy-era Predator AAV. The side hatches used for the Mk 1 Rhinos and Predator AAVs are very thin (about 1/16") and would not really hold a magnet. I thought of backing them with a thin sheet of metal but I had nothing at hand that would work. I settled on using paperclips. It was easy to drill three small holes in the back of the hatches making sure not to punch through to the other side. I then cut some small pieces of paperclip and super glued them into the holes. I waited several hours before I filed them paper clip ends flush with the back of the hatches. Bamn, instant metal plugs that the magnets in the hull will grab onto easily.
Here is a look at what I came up with (this is before I filed them flush):
So while those dried I worked on the Predator side sponsons. I wanted to be able to switch them up from Heavy Bolters or Lascannons or Heavy Flamers. I had access to some Hvy Bolters and Lascannons so they were the first to get the magnetic treatment. I also wanted to be able to switch out the main turret weapon and once again the conversion kit was a dream to work with. The turret is designed to slot in a standard GW weapon (I used the Autocannon) and also comes with a turret weapon mount that has holes for magnets which I plan on using to mount the twin-linked assault cannons for a Baal Predator option.
Some shots of the Mk 1 Predator chassis and side sponson loadouts:
I have a little thing that I like to do with my Blood Angel vehicles and that is to have some 'crazy' commanders. I wanted this guy to be holding the Stormbolter option and have the Hunter-Killer Missile be pintle-mounted. I think he turned out decent and he certainly maintains the 'crazy' tank commander look.
Here is a little closer look at him:
So the initial build is complete. All that needs to be done now is 'bling' it up a bit with some Blood Angel Icons. I plan on doing some winged blood drops on the turret which I have a press-mold set up for. Maybe a nice Icon on the front or rear hatch. Might add the winged blood drops to the side sponsons as well. I have to make sure of the actual loadout available to a Predator AAV (things like smoke launchers, search lights, etc.) before I add those but all in all not to bad I think.
Comments are always welcome and thanks for looking.
Sunday, August 28, 2011
First Post and Lightbox fun
Well I thought it was well past time for me to actually work on this blog of mine. After a recent move I find myself with more Hobby time (but not a lot of room yet) so this weekend I set a goal for myself to assemble a simple lightbox. My hope is that the lightbox will allow me to take better pictures of my painted miniatures. So with that in mind I gathered my necessary supplies:
1) A decent sized cardboard box. The one I used was white on the inside to begin with but you could use whatever stricks your fancy. Make sure the box you use will fit your figures including vehicles.
2) Some parchment paper (used to difuse the light)
3) Sharp utility knife
4) Clear tape
5) Can of white spray paint/primer
With my supplies gathered I set out to cut out the 3 openings in the box. The 2 short sides and the top of the box get a good sized opening cut into them. I went with an opening that was roughly 2/3 the size of the area of the box. Basically you want to leave an area around the edges of the cutout area that you can attach the parchment paper to. This 'frame' that you cutout also keeps the box more stable.
Once you have the box cutout on 2 sides and the top you can spray the inside of the box with your white spray paint. This will help insure that the inside of the box maintains a white nonreflective surface. Once the paint has dried you can now cover the openings you cutout in the box with sheets of parchment paper. Make sure you have the parchment paper pulled tight before you tape it down completely.
Now you are ready to take better pictures of your minis, at least I hope so!
I snapped a couple of pictures of my most recent miniature, he is my figure for our Rogue Trader game. Here is a shot of him before the lightbox:
Here is a shot of him after the lightbox:
1) A decent sized cardboard box. The one I used was white on the inside to begin with but you could use whatever stricks your fancy. Make sure the box you use will fit your figures including vehicles.
2) Some parchment paper (used to difuse the light)
3) Sharp utility knife
4) Clear tape
5) Can of white spray paint/primer
With my supplies gathered I set out to cut out the 3 openings in the box. The 2 short sides and the top of the box get a good sized opening cut into them. I went with an opening that was roughly 2/3 the size of the area of the box. Basically you want to leave an area around the edges of the cutout area that you can attach the parchment paper to. This 'frame' that you cutout also keeps the box more stable.
Once you have the box cutout on 2 sides and the top you can spray the inside of the box with your white spray paint. This will help insure that the inside of the box maintains a white nonreflective surface. Once the paint has dried you can now cover the openings you cutout in the box with sheets of parchment paper. Make sure you have the parchment paper pulled tight before you tape it down completely.
Now you are ready to take better pictures of your minis, at least I hope so!
I snapped a couple of pictures of my most recent miniature, he is my figure for our Rogue Trader game. Here is a shot of him before the lightbox:
Here is a shot of him after the lightbox:
While the difference is not huge I do like what the lightbox has to offer. Of course I am still learning how to use my digital camera. Expanding our knowledge base while having fun playing with little toy soldiers, what more could we ask for!?!
Subscribe to:
Posts (Atom)